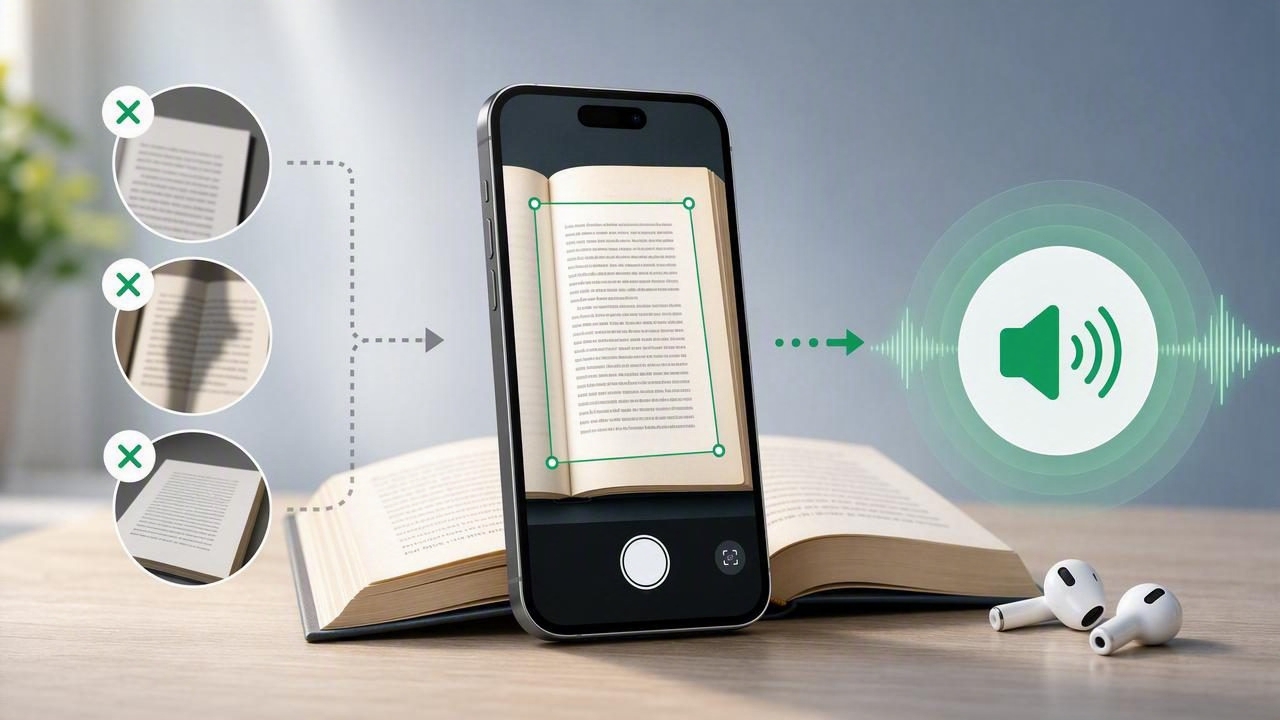
A camera scan to speech app can make printed information far more flexible. Instead of being limited to reading a handout, book page, letter, recipe, or worksheet on paper, you can capture it with an iPhone or iPad and listen while walking, commuting, cooking, or resting your eyes.
However, the quality of the spoken result depends heavily on the scan. Even a capable text-to-speech app cannot reliably turn a dark, crooked, blurry photo into clean narration. A few avoidable scanning mistakes can cause missing words, strange sentence breaks, incorrect numbers, and robotic-sounding pauses.
This guide explains the most common camera scan to speech mistakes, why they matter, and how to create clearer scans that are easier to listen to. Whether you are studying, managing paperwork, supporting accessibility needs, or simply trying to get through more reading, these practical steps can improve both text recognition and audio quality.
Why scan quality matters for text to speech
Camera-based scanning usually works in two stages. First, optical character recognition (OCR) identifies letters and turns the image into editable digital text. Then text-to-speech technology reads that text aloud using a selected voice, speed, and language.
If OCR misreads the source, the voice will read the mistake exactly as it appears. For example, it may confuse:
- “O” and “0” in product codes or account numbers.
- “l,” “I,” and “1” in names, citations, and passwords.
- “rn” and “m” in smaller printed fonts.
- “5” and “S” in invoices, forms, and older documents.
- Headers, footnotes, page numbers, and captions with the main body text.
That is why a good workflow is not simply “take a photo and press play.” It is prepare, scan, review, then listen. A minute spent improving the image can prevent repeated confusion later.
1. Scanning in poor or uneven lighting
Low light is one of the biggest causes of weak OCR. In dim conditions, the camera may increase exposure or introduce visual noise. Under a single overhead lamp, a hand or phone can also cast a shadow over part of the page. Glossy paper may produce bright reflections that hide entire lines.
How to avoid it
- Use bright, indirect daylight when possible.
- Place the page on a flat surface near a window, but avoid direct sun glare.
- Use two light sources from opposite sides if shadows are unavoidable.
- Move the page or camera slightly until reflections disappear.
- Check that the paper appears evenly lit before capturing it.
For a single page, it can be helpful to take two scans from slightly different positions. If one version has glare over a paragraph, the second may be much more readable.
2. Holding the device at an angle
A page photographed from the side becomes a trapezoid rather than a rectangle. Many scan tools can correct perspective, but major distortion still makes small text harder to recognize. Curved pages near a book binding create a similar issue, particularly with paperbacks and thick textbooks.
When a scan is skewed, text recognition may merge lines, skip words at the edges, or read columns in the wrong order. This is especially frustrating when you need document narration for academic material, legal notices, or detailed instructions.
Better scanning technique
- Lay the document as flat as possible.
- Hold the iPhone or iPad directly above the center of the page.
- Keep all four edges visible in the camera frame.
- Wait for automatic edge detection or manually adjust the crop corners.
- Confirm that text lines look horizontal before saving.
For bound books, gently hold the page open near the spine without covering text. If the center remains curved, scan one page at a time and use a little more distance so the app can detect the full page boundary.
3. Capturing blurry text because the camera is moving
Blur is easy to miss on a phone screen, especially when you are quickly scanning several pages. Yet small motion blur can turn crisp letters into ambiguous shapes. OCR may still extract some text, but the resulting audio can contain odd substitutions and broken phrases.
Do not assume a scan is usable just because it looks acceptable at full-screen size. Zoom into a few lines of small print, especially near the top and bottom of the page. If individual letters are not sharp, rescan before moving on.
To reduce blur, stabilize your hands, rest your elbows on a table, or support the device with a stand. Tap the screen to focus on the text if your camera tool does not focus automatically. Also allow the camera a moment to adjust before pressing the capture button.
4. Trying to scan too much at once
A common camera scan to speech app mistake is trying to capture a double-page spread, a newspaper sheet, or several documents in one image. While this may seem faster, it often creates very small text and confusing reading order. Columns, sidebars, images, and captions can become mixed together in the recognized text.
For the clearest listening experience, scan one logical section at a time:
- One book page per scan.
- One side of a form per scan.
- One recipe card or instruction sheet per scan.
- One article column or section if the layout is complex.
This approach also makes it easier to navigate later. Instead of listening through a long, disorganized document, you can return directly to the page or section you need.
5. Ignoring the language and voice settings
OCR and text-to-speech work best when the chosen language matches the document. If you scan French notes while the recognition or voice language is set to English, names, accents, and ordinary words may be handled poorly. The same applies to bilingual documents, language-learning material, and books that include quoted passages in another language.
Before scanning, check the available recognition language options. After the text is created, choose a natural voice that supports the document’s primary language. This can make a dramatic difference in pronunciation and listening comfort.
| Document type | Recommended setup |
|---|---|
| English class handout | English OCR and an English voice |
| Spanish recipe | Spanish OCR and a Spanish voice |
| Bilingual study sheet | Scan sections separately when possible and switch voices as needed |
| Technical document | Use the primary language, then review terms, abbreviations, and numbers |
6. Skipping the text review before pressing play
Listening is often more efficient than reading, but it is not always the best way to catch OCR errors. A quick visual review is essential when accuracy matters. Scan the extracted text for obvious missing lines, incorrect headings, merged paragraphs, and mistakes in dates, totals, names, or measurements.
This is particularly important for medical instructions, contracts, financial statements, school assignments, and travel details. Text-to-speech is a powerful reading aid, but it should not be your only verification method for high-stakes information.
Use audio to make reading more accessible and convenient, but verify critical details against the original document.
If your app allows editing, correct clear OCR errors before listening. Even changing a misread abbreviation or adding punctuation can improve pronunciation and pacing.
7. Forgetting that layout affects reading order
Printed pages are designed visually. A human reader can instantly see that a title belongs above an article, a caption belongs under an image, and a sidebar is separate from the main text. OCR may not always make those distinctions correctly.
Watch for layouts that need extra attention:
- Newspapers and magazines with multiple columns.
- Forms with boxes, labels, and handwritten notes.
- Slides, posters, and infographics.
- Tables with numbers arranged across rows and columns.
- Pages containing charts, equations, or footnotes.
For these documents, crop tightly around the most important text rather than scanning the entire page. A table may need to be read visually first, while the explanatory paragraphs can be scanned for audio. Dividing complicated material into smaller pieces produces more coherent narration.
8. Using the wrong playback speed
After creating a clean scan, it is tempting to increase playback speed immediately. Faster audio can be useful for familiar material, routine articles, or a second review. But speed cannot fix unclear content. If the scan includes unfamiliar terminology, numbers, or dense academic ideas, fast narration may make it harder to understand and remember.
Start at a comfortable speed, then increase gradually. Many listeners find that a moderate pace works best for new information, while faster playback is effective for review. If your app provides synchronized highlighting, use it for difficult passages so your eyes can follow the words while your ears hear them.
9. Not saving important scans for offline listening
A useful scan is not much help if you need it later in a place with poor connectivity. Students may want to review printed notes between classes. Travelers may need to hear an itinerary on a plane. Commuters may want to catch up on a document underground or in areas with inconsistent service.
When your text-to-speech app supports offline listening, download or save essential scans before leaving Wi-Fi. Give files meaningful names, such as “Chapter 4 Biology Notes” rather than “Scan 12,” so they are easy to find when you need them.
A simple checklist for clearer scan-to-speech results
- Use bright, even light without glare or heavy shadows.
- Keep the page flat and the device parallel to it.
- Make sure the text is sharp before saving.
- Scan one page or logical section at a time.
- Select the correct language for recognition and narration.
- Review extracted text, especially names, numbers, and dates.
- Crop complex layouts to focus on the main content.
- Choose a listening speed that matches the difficulty of the material.
- Save important documents for offline access.
Make printed text easier to use
The best camera scan to speech workflow is simple: capture clear text, check the conversion, and listen in a way that fits your day. With better lighting, straighter pages, careful cropping, and a brief review step, printed materials can become useful audio for studying by listening, accessibility support, or everyday productivity.
If you want to turn scans alongside PDFs, web articles, ebooks, and pasted notes into audio on iPhone or iPad, Focal Voice offers one way to keep those reading materials in a single listening workflow.
